Cytomine Enterprise Edition is the closed source edition of the Cytomine software.
This repo provide the new way to install Cytomine Enterprise Edition, based on Docker compose.
DISCLAIMER : the version of Cytomine Enterprise Edition installed using this procedure is still in development, and is made available only for testing purpose. Do NOT use for production, nor to migrate data from an older version of Cytomine.
# Install Enterprise Edition Teaching
# Install a local instance
This installation procedure is for desktop or laptop computers running a Debian based Linux operating systems.
You must have installed Docker engine (opens new window) and git, and have root permissions (sudo in Debian/Ubuntu).
Log in to our platform To be able to get the Cytomine Enterprise Edition Teaching project, you need to have credentials:
- a
username - and a
deploy_tokenwich is basically your personnal password. Please replace them in the following command
git clone --branch EET2024.1 https://<username>:<deploy_token>@gitlab.cytom.in/cm/rnd/cytomine/products/entreprise-edition-teaching.git
docker login -u <username> -p <deploy_token> registry.cytom.in
1
2- a
Go into the cloned folder:
cd entreprise-edition-teaching/1Launch the Cytomine installer. This will create all the folders and files necessary to launch Cytomine with Compose:
./cytomine install1Edit the file
cytomine.ymlif you want to change default values (like URLs and/or SMTP setup).Launch cytomine:
./cytomine start1Use Cytomine : If you have kept the default values your Cytomine is now available on
http://127.0.0.1. By default, an admin account has been created for you. To connect to the platform in your browser, retrieve the randomly generated admin password by opening yourcytomine.ymlfile and go toservices: default: core : constant: ADMIN_PASSWORD:. You can use this password with theadminusername to get authenticated on your Cytomine. Once authenticated, update this admin password to a more personal one.
# Install on several servers
Depending on your usage, the number of servers can be scaled. Here are two examples.
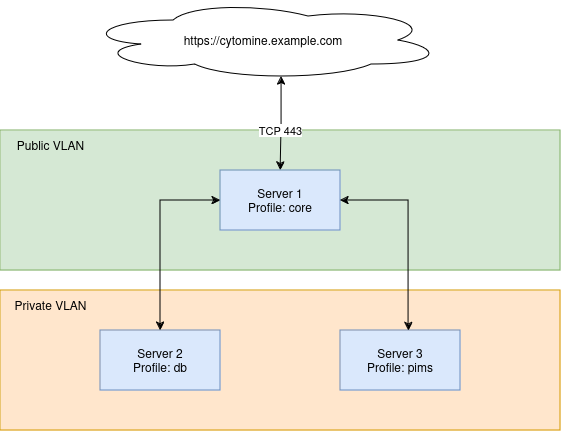
# 3 servers Cytomine installation
In this configuration, a server with the profile core is exposing its 443 TCP port to the internet.
The databases and pims are running on other servers, isolated on another VLAN for more security.
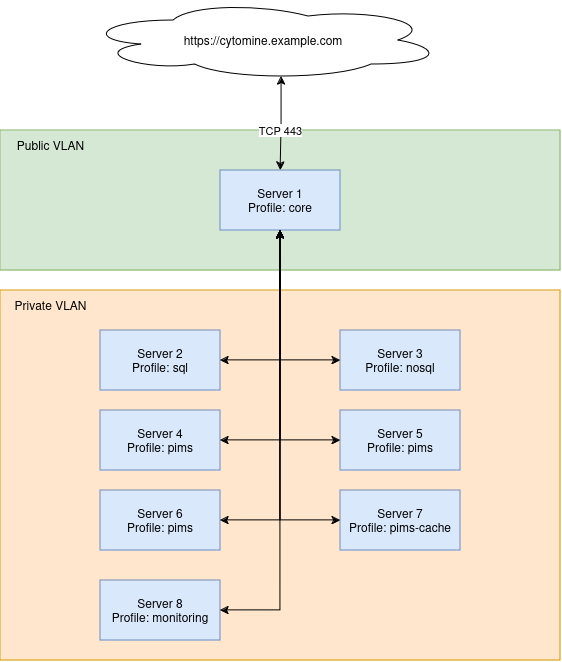
# 8 servers Cytomine installation
In this configuration, a server with the profile core is exposing its 443 TCP port to the internet.
In another isolated VLAN are running several other servers.
- The databases load can be split on 2 servers (server 2 & 3 with profiles
sql&nosql) - The
pimsservice that handles image processing and tiles server is load-balanced over 3 servers - The
pims-cacheandmonitoringservices are also deployed on dedicated servers.
# Cytomine setup
- Proceed to the
Install a local instance procedureabove. - Edit the
cytomine.ymlfile to update the URIs of the services. - Apply a local profile on each server:
./cytomine.sh profile core. This will create a fileenvs/local.options.<host_machine_name>.envthat will define a profile to select what services to run on this machine.
# cytomine main commands help
/entreprise-edition-teaching$ ./cytomine
Usage: ./cytomine <command> [arguments]
    where command is one of:
      install     Run the Cytomine EET installer
      restart     Stop & Start Cytomine EET
      set         Set Cytomine EET options. See ./cytomine set command for more details.
      start       Start Cytomine EET
      stop        Stop Cytomine EET
      sync_config Send the Cytomine configuration files (cytomine.yml, .env, envs/, ...) to other servers. See ./cytomine set sync_config_targets.
      update      Update Cytomine EET
# cytomine set help
/entreprise-edition-teaching$ ./cytomine set
Usage: ./cytomine set <option> <value>
    where <option> is one of :
        profile and <value>
            standalone        All services will be launched on this machine.
            core              Only those services will be launched on this machine: proxy, core, web_ui.
            core_and_db       Only those services will be launched on this machine: proxy, core, web_ui, postgis, mongo.
            db                Only those services will be launched on this machine: postgis, mongo.
            sql               Only those services will be launched on this machine: postgis.
            nosql             Only those services will be launched on this machine: mongo.
            pims              Only those services will be launched on this machine: pims.
            pims-cache        Only those services will be launched on this machine: pims-cache.
            monitoring        Only those services will be launched on this machine: prometheus, alertmanager.
        Several profiles can be applied as a coma separated list.
        Example:
            ./cytomine set profile standalone
            ./cytomine set profile 'db,monitoring'
        sync_config_targets and <value>
        In a multi-server installation, the Cytomine configuration files can be sent from the CORE severs to others.
        Only suited for server with profiles: core, core_and_db.
        All servers should be allowed to rsync freely with SSH keys loaded.
        Example:
                    ./cytomine set sync_config_targets '(server2)'
                    ./cytomine set sync_config_targets '(server-db server-ims)'
2
3
4
5
6
7
8
9
10
11
12
13
14
15
16
17
18
19
20
21
22
23
24
25
26
27
28
29
30
31
32
33
34
35
36
37
38
39
40
41
42
43
44
- (optional) Tell the
coreserver where to send the Cytomine configuration to with./cytomine set sync_config_targets '(server-db server-ims)', then send the configuration with./cytomine sync_config. - Run Cytomine as usual with
./cytomine startby starting first Cytomine on the server(s) with the databases profiles.
# Enable TLS certificates
Cytomine EET comes with TLS out of the box. By default, a self-signed certificate will encrypt the HTTPS trafic. However, this might not be suitable for production as users will have to trust that certificate manually.
See this configuration block inside the cytomine.template:
global:
  proxy:
    constant:
      # The proxy can work in several configuration modes:
      # `HTTP-only`                | (default) Listen only to `TRAEFIK_HTTP_LISTEN_PORT` and `TRAEFIK_HTTPS_LISTEN_PORT` ports wit ha self-signed certificate
      # `LE-TLS-challenge`         | Generate LetsEncrypt certificates using [`TLS-ALPN-01`] challenge. Container must be reachable through port 443. Warning: Note that Let's Encrypt API has rate limiting.
      # `LE-staging-TLS-challenge` | Same as `LE-TLS-challenge` but using staging CA server. Useful when installing to avoid hitting Let's Encrypt API rate limiting.
      # `Custom-ACME`              | Use a custom ACME provider instead of Let's Encrypt. In that case, we use a custom CA's API to issue and renew certificates.
      #                            | When `CONFIG=Custom-ACME` please provide values in the block 'services.traefik' below.
      CONFIG: HTTP-only
      # Needed if `CONFIG=Custom-ACME`. Custom ACME server. See docs https://doc.traefik.io/traefik/https/acme/#external-account-binding
      ACME_URL: none
      # Needed if `CONFIG=Custom-ACME`. HMAC key from External CA, should be in Base64 URL Encoding without padding format
      EAB_HMAC: none
      # Needed if `CONFIG=Custom-ACME`. Key identifier from External CA
      EAB_KID: none
2
3
4
5
6
7
8
9
10
11
12
13
14
15
16
To quickly use LetEncrypt to generate and automatically renew certificates, set global.proxy.contant.CONFIG: LE-TLS-challenge and restart Cytomine.
It is also possible to leverage ACME with your certificates' provider. See ee docs https://doc.traefik.io/traefik/https/acme/#external-account-binding (opens new window) and fill ACME_URL, EAB_HMAC and EAB_KID parameters.
# 🎉 Your app is ready
The password of the admin account is available in the cytomine.yml file : cat cytomine.yml | grep ADMIN_PASSWORD:
To learn how to use Cytomine please refer to the user guide in our documentation (opens new window).
← Introduction Upgrade →