# BIGPICTURE specific features
This page describes the specific features of the BIGPICTURE edition.
# Light import
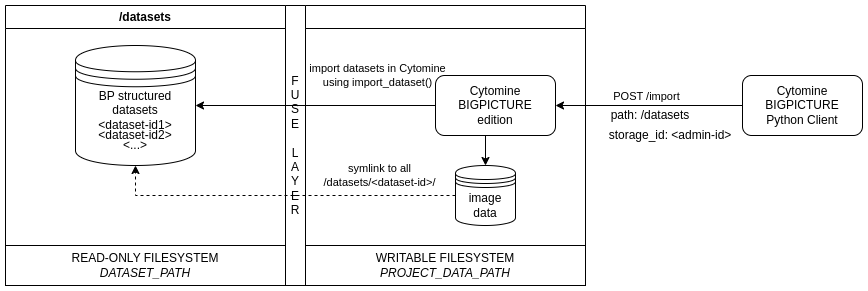
This section outlines the procedure for performing a light import of local BP datasets, which are formatted according to the BP Dataset File Structure Standard (opens new window).
Here, "Local" means visible by the Cytomine instance (e.g., on BigPicture WP2 infrastructure through a mounted FUSE layer, or on your own system using a regular filesystem). "Light import" means that no explicit copies or duplication of files are performed, only database entries and symbolic links are created.
The procedure follows the same Docker-compose deployment procedure as the Cytomine-community-edition but includes modified modules to ensure compatibility with BP standards and workflows. It requires the use of bigpicture-cytomine-python-client (opens new window) to interact with the Cytomine instance in Python.
If your data are encrypted, place the information of the Crypt4GH keys into the
cytomine.templatefile, where theCRYPT4GH_PUBLIC_KEYis optional and is the public sender key file,CRYPT4GH_PRIVATE_KEYis the filename of your private key, e.g.,receiver.sec.pem,- and
CRYPT4GH_PASSPHRASEis the password given when you created your keys (See Generate the public and secret key (opens new window)).
The variables to be replaced in
cytomine.templateshould follow the format shown below.keys: constant: CRYPT4GH_PUBLIC_KEY: sender.pub.pem CRYPT4GH_PRIVATE_KEY: receiver.sec.pem CRYPT4GH_PASSPHRASE: receiver_passphrase1
2
3
4
5WARNING
⚠️ The variables
CRYPT4GH_PUBLIC_KEYandCRYPT4GH_PRIVATE_KEYhave to be the filename and not the path to its location ⚠️You will have to add the public sender key file and your private key file into
./data/keysfolder, e.g., thesender.pub.pemandreceiver.sec.pemfile.Install the Cytomine Bigpicture edition by following the installation procedure.
Create Cytomine users (firstname, lastname, email, and password) for this specific Cytomine instance either manually or by using bigpicture-cytomine-python-client script (as demonstrated in add_user.py (opens new window)). The length of the password should be at least 8 characters.
WARNING
It is recommended to change the password after creation, as it is transmitted in plain text to Cytomine during the user creation process.
Mount the directory (e.g., WP2 FUSE layer) where the datasets are stored. It is assumed that this directory contains one or multiple directories (one for each BP dataset, with each one being formatted according to BP Dataset File Structure Standard (opens new window)). The mount point should remain the same throughout the lifespan of the Cytomine instance and is specified in the
DATASET_PATHvariable incytomine.template, where the default value is./data/dataset.# Path to the directory where image dataset folders (if any) are stored for importing large numbers of images. DATASET_PATH: ./data/dataset1
2Call import Cytomine API endpoint using bigpicture-cytomine-python-client (opens new window)
cytomine.import_datasets()with the host URL, the public and private keys of the admin. This will import datasets (including images and MSMDad metadata) and create one Cytomine project for each imported dataset. This example (opens new window) illustrates the importation of the datasets.TIP
Note that the datasets path is the path provided in the
cytomine.templatefile.ℹ️ Datasets that have already been imported will not be re-imported.
To launch the example script, assuming you have installed the bigpicture-cytomine-python-client (opens new window):
cd bigpicture-cytomine-python-client/examples
python import_datasets.py --host <cytomine-host> --private_key <private-key> --public_key <public-key>
1
2where
<cytomine-host>is your Cytomine host,<private-key>is your private key, and<public-key>is your public key.Grant access to the Cytomine instance, where the admin can either manually assign users to projects (with one dataset corresponding to one project) or use the bigpicture-cytomine-python-client to automatically link users to projects.
# Not yet supported
- Import "ontology" from observation.xml
- Import annotations and link to users.
# Content-Based Image Retrieval
Content-Based Image Retrieval (CBIR) enables efficient searching and comparison of visually similar annotations by leveraging deep learning models. This feature extracts high-dimensional feature vectors from the annotation bounding boxes, allowing retrieval based on visual similarity.
There are currently 2 supported models:
- ResNet
- H-Optimus-0 model from Bioptimus
The CBIR service uses by default the ResNet as model, where the weights are embedded in the Docker images.
To change the model to be used, the variable EXTRACTOR in the cytomine.template file has to be changed:
cbir:
  constant:
    HOST: redis
    DB: 0
    # Choices: ['resnet', 'hoptim']
    EXTRACTOR: resnet
2
3
4
5
6
TIP
It is recommended to use the same feature extractor throughout the lifespan of the Cytomine instance to ensure consistency and reliability in image retrieval results.
When running the CBIR service for the first time with the H-Optimus-0 model selected instead of ResNet, the model weights will be downloaded automatically. Note that H-Optimus-0 is a large model (~4GB), so the initial download may take some time before the service becomes fully operational.